Setting up Magento 2.4 on windows 10 with Docker
What a wild ride this was, setting up Magento with Docker, it actually killed my aging mechanical hard drive with all the operations that were performed on it, but now I have a nice and fast SSD, so win-win.
For this article, I am going to assume that you are familiar with all the things and jargon I am going to mention here and that you will know what to do when I mention certain actions. If you do not know any of these, try googling it first, and if you don't understand it after that, leave a comment and I'll try to explain it :-)
Assuming also that you have a fresh system to run from with no tools pre-installed. If you have certain tools like docker already installed, skip those steps and use what you need.
Enabling virtualization
Find out what the hotkey is for your systems bios(usually F2 but it differs on some systems) and restart your system and enter the bios.
Find a setting called virtualization and set that to enable. If you can't find it, then it sometimes helps to google "Enable virtualization YOUR_SYSTEM/MOTHERBOARD_NAME_HERE".
Save and exit your bios.
Installing the Linux subsystem WSL
Back in Windows install the Linux subsystem and update the kernel to version 2 following the manual at https://docs.microsoft.com/en-us/windows/wsl/install-win10
In case the page goes offline these are the commands that need to be executed in PowerShell in administrator mode(Start > search PowerShell > right-click > run as Administrator).
PS C:\Users\You> dism.exe /online /enable-feature /featurename:Microsoft-Windows-Subsystem-Linux /all /norestart

PS C:\Users\You> dism.exe /online /enable-feature /featurename:VirtualMachinePlatform /all /norestart
download the kernel and install: https://wslstorestorage.blob.core.windows.net/wslblob/wsl_update_x64.msi
PS C:\Users\You> wsl --set-default-version 2The manual at docs.microsoft.com continues to say you can now install a Linux distro from the Microsoft store, you don't need to install one, you can if you want though, but it's not needed for this tutorial.
Install Docker
Download docker for windows and install it. https://docs.docker.com/docker-for-windows/install/
Clone A prepared Magento Docker Setup repository
Clone the git repository at https://github.com/echo-magento/docker-magento2 (repo at the time of writing this article: https://github.com/tschallacka/docker-magento2) in a directory of your choice, but I recommend going as close to C:\ as possible due to long filenames and windows sometimes being difficult about it.
Creating a Docker Directory
I'm going to assume you will create a directory C:\docker. Right-click the directory and select properties. In the properties go to the Security tab.

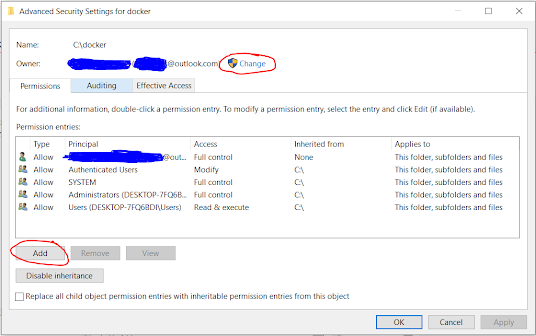

The reason why you need to add explicit permissions for yourself to his folder, instead of just generic user permissions, is that it might otherwise mess with the exposed folder/mounted volume from the docker container. You might not have read/write rights if your explicit user is not set as docker uses your windows user permissions to check if there are read/write permissions.
Setting up the docker container
Open up cmd and enter to the directory you cloned into.
C:\users\you > cd C:\docker\magento

C:\docker\magento> docker-compose up
Go brew yourself a nice cup of tea or coffee and enjoy the installation. Depending on your system and internet speed this might take a few minutes.
Giving elastic search an enlarged heap space
Elastic search needs a really large heap space to function properly. The 768MB default heap space isn't large enough, and the Elasticsearch container will refuse to boot.
To fix this you need to run this every time when your Windows has restarted or you restarted your Docker instance.
C:\docker\magento> wsl -d docker-desktopIn the WSL terminal interface that opened up type
$# sysctl -w vm.max_map_count=262144This will ensure Elasticsearch will be able to run. That will be the only container that will have refused to boot if you check docker for windows.
If you have a Windows insider account and run build 21286 you might try editing /etc/wsl.conf from the network path \\wsl$\docker-desktop\etc by adding
[boot]
command="sysctl -w vm.max_map_count=262144"
I don't know if that works or not as I don't have a windows insider account. Please let me know if that works if you have a Windows insider account and run a newer build.
Starting the Docker containers
Now stop all containers with the stop button in Docker for windows, wait for them to shut down. Then start them again.
If you click the green icon it should fold out, and eventually, all containers should be green.
Opening the Magento CLI
Click on the image docker-magento2-apache_1
Click on the CLI icon to get into that image his bash shell

Setting up the Magento runtime
$# apt-get install sudoWe need sudo, which doesn't come pre-installed with this, so we can fake being the www-user when executing commands.
Then execute the commands, with my own twist, that are mentioned in the git repo to kickstart the installation.
$# cd /var/www/html
$# rm index.php
$# install-magento2
You will need to run chown -R www-data:www-data * when Magento is done installing.(This line is debatable, my notebook did a windows update reboot whilst busy, so it might have skipped a few steps, currently in process of testing this out)
At some point, the installation will ask for your Magento keys for the composer installation. Follow this manual to obtain them https://devdocs.magento.com/guides/v2.4/install-gde/prereq/connect-auth.html
The keys are some long hexadecimal keys where the public key is your username and the private key is your password. Do not share those keys with others.
Paste the keys in by pressing the copy button on the website(This is to prevent spaces from being copied)


Adding a Magento admin user via CLI
When the install is finished you need to create a new user for yourself, as the default user doesn't work(didn't work for me, but maybe that's just me)
$# bin/magento admin:user:create --admin-user='username' --admin-password='password123_needs_numbers_too' --admin-email='example@example.com' --admin-firstname='Admin' --admin-lastname='Admin'Setting up the Magento installation for development
Now if you intend to use the system for development and not for production I recommend that you perform the following steps also:
You need a plugin to disable 2-factor authentication for development purposes without disabling a lot of other security features.
To install it enter the following commands in the Magento CLI
$# composer require markshust/magento2-module-disabletwofactorauth
$# bin/magento module:enable MarkShust_DisableTwoFactorAuth
$# bin/magento setup:upgrade
$# php bin/magento setup:di:compile
$# php bin/magento setup:static-content:Deploy -f
$# find var/ -type d -exec chmod 775 {} + && find var/ -type f -exec chmod 665 {} +
$# find generated/ -type d -exec chmod 775 {} + && find generated/ -type f -exec chmod 665 {} +
$# chown -R www-data:www-data *

When the plugin has finished installing run the following 2 commands
$# bin/magento config:set twofactorauth/general/enable 0
$# bin/magento config:set twofactorauth/general/enable_for_api_token_generation 0
And now you can try visiting your Magento store at
Please note, depending on specs, loading may be painfully slow as all the files that are needed are generated on demand, it took on my system with a 2.6ghz first time almost a minute, this is compounded by the file access issues due to the interface with the windows file system(see the end of the article). On the second load it will be faster to respond, but still slow. This is a limitation of running Magento in Docker on windows. On Linux this is blazing fast.

Log in with the credentials you have entered and when you've arrived at the admin panel browse to
Stores > Configuration > Advanced > Admin > Security
Uncheck use System value and change "Admin Session Lifetime (seconds)" to 31536000
This prevents you from being logged out after having coded something for a few minutes.

Coding for Magento
Should certain directories not show up or throw errors like this or that is not readable, run a chown -R www-data:www-data * in the directory from the Magento CLI
Notes and gotchas's
I've looked into the cause, and it's the way the shared volume is mounted between the Docker container and Windows. Each file that gets accessed via the SMB interface between the two is verified if there's access, and each file that is written is also checked, and written in direct access mode. And since Magento is an install when completed with 750mb of data on disc with 102k files you can imagine how hard a CPU has to work when a large part of these have to be loaded into OPCache, page rendering templates accessed, etc...

In a pinch, this will work, if you have the patience for it, and you spend most of your time just writing code. But if you really need the most speedy responses, I really suggest you set up a Linux boot USB or a Distro on a shared partition/ seperate disk. For a Linux setup you can also follow this article, minus the WSL/docker for windows setup. Just ensure you have followed Docker's best practices for installing on your distribution.
Technically it works, it's just the way files are shared so you can edit them in Windows is a relatively slow and inefficient method with the many file accesses Magento needs.
A direct read/write test of a single file averaged to 240mb/s, so speed is possible, but not in the many individual files Magento consists of.
There are people who have set caching mode for the volume mount to "loose"(basically means dump all changes in a cache, write when possible, don't wait for writing to complete to progress with the application), but that risks a loss of data integrity when multiple processes try to write to the same file at the same time.
There are also solutions with ldsync, but that means your files will be at the least one second behind in the container, and it's a pain to set up. I need to explore the ldsync option more so I can modify the install script as it is now. For those who wish to explore a docker configuration with ldsync can take a peek at https://gist.github.com/tschallacka/5d842e814e80c483aef3c5b2bb55b710

Comments
Post a Comment